June 1, 2012

Blueberry Pie


For some reason blueberry pie reminds me of summer.  Since summer is fast approaching, I figured it was time to make blueberry pie.  Isn't it funny how we wait for certain times of the year to make certain things?  Like pumpkin pie...people only seem to make it around Thanksgiving.  Maybe I should turn things around and make pumpkin pie in the summer and blueberry pie for Thanksgiving just to see who's paying attention!

I had made up my mind to make blueberry pie before my husband requested strawberry rhubarb pie.  I had to tell him I'd make him a pie, just not the one he wanted.  I think I see a strawberry rhubarb pie in the near future


This recipe comes from a Stonewall Kitchen cookbook.  It's the only blueberry pie recipe I will ever use.  It's delicious, and there really is no reason to mess with it.  The only thing I "changed" was that I added more blueberries than the recipe calls for.  I also don't use their pie crust recipe because I tried it and found that I prefer my own.  Oh, and their recipe has you brushing the top crust with an egg wash but I brush it with 1/2 & 1/2 and sprinkle sugar on instead.  Everything else is perfect the way it is.

Blueberry Pie

9-inch double pie crust (Click here for my Perfect Pie crust recipe)
1 tbsp unsalted butter
2 tbsp all-purpose flour
6 cups blueberries
1/2 cup sugar
1 tbsp grated lemon zest
1 tbsp fresh lemon juice
Pinch of salt
1/4 tsp cinnamon
1/4 tsp nutmeg

Melt butter in medium saucepan on medium heat. Add flour and stir to combine, about 1 minute. Add half the blueberries and all the sugar and cook 8-10 minutes. The sugar will be dissolved and the mixture has thickened. Add the remaining blueberries and the rest of the ingredients and stir to combine. Raise the heat to medium-high and cook for another minute, then remove from heat. Let the filling cool to room temp.

Roll out one of the disks of dough and transfer to a 9-inch pie plate, making sure the dough falls over the edges of the pie plate. Spoon blueberry mixture into the pie plate. Roll out the other disk of dough, and cut into strips about 1/2 inch wide. Place strips on top of filling, creating a crisscross lattice pattern. Trim off excess crust and crimp the edges with together with a fork. Place pie in refrigerator for at least 30 minutes or up to 4 hours.

Place pie on cookie sheet and brush top with cream or 1/2 & 1/2, then sprinkle with sugar. Bake at 375 for 50-60 minutes, or until crust is golden brown and the filling is bubbling.

May 31, 2012

Jalapeno Popper Stuffed Chicken


Several weeks ago I came across this recipe for jalapeno popper stuffed chicken, and I thought "Mmmmm....now that sounds good!"  I knew it was going to the top of the pile of recipes I've been wanting to try.  I love chicken, but let's face it - it can get boring, to cook and to eat.  

Since both my husband and I love jalapeno poppers, I figured he might enjoy this dish as well.  So last week I set out to make it.  After I threw it together and put it in the oven, my left hand started to hurt.  It felt like I had paper-cuts all over my hand but I couldn't find any.  Not long after my other hand started to hurt....then it hit me - they were burning from handling the jalapeno peppers!  Haha, mystery solved.  Unfortunately they burned for a few hours, but once I figured out why I was able to ignore it. 

The burning hands were a small price to pay for this wonderful dish!  My son, who has never tried a jalapeno popper, LOVED this recipe.  So did my husband and I.  It's full of flavor, and it was just so nice to try something different and to discover a new dish that we all enjoyed.  My husband, whose favorite chicken dish is Chicken Cordon Bleu, said he liked this better!  I was shocked by this declaration.  This dish is now added to our "favorites" pile and will become part of the "chicken rotation".  You gotta try this one.... 


Jalapeño Popper Stuffed Chicken adapted from Skinnytaste.com

2 slices bacon, cooked & crumbled
3 jalapeños, chopped (remove seeds for milder)
3 oz 1/3 less fat cream cheese, softened
4 oz reduced fat shredded cheddar jack
2 tbsp chopped scallions
8 thin sliced skinless chicken breast cutlets
1/2 cup Italian seasoned whole wheat breadcrumbs
1 tbsp olive oil
salt and fresh pepper
olive oil non-stick spray

Preheat oven to 450° & spray a large baking dish with non-stick spray. Washand dry chicken cutlets, season with salt and pepper.  Combine cream cheese, cheddar, scallions, jalapeño and bacon crumbles in a medium bowl.
Lay chicken cutlets on a working surface and spread 2 tbsp of cream cheese mixture on each cutlet. Loosely roll each one, secure the ends with toothpicks to prevent the cheese from oozing out.  Place breadcrumbs in a bowl; in a second bowl combine olive oil with salt and pepper.

Dip chicken in oil, then in breadcrumbs and place seam side down on a baking dish. Repeat with the remaining chicken. When finished, lightly spray the top of the chicken with oil spray. 
Bake for 22-25 minutes, or until chicken is cooked through.  Serves 4 (2 per person).

May 30, 2012

Horseradish & Dill Dipping Sauce


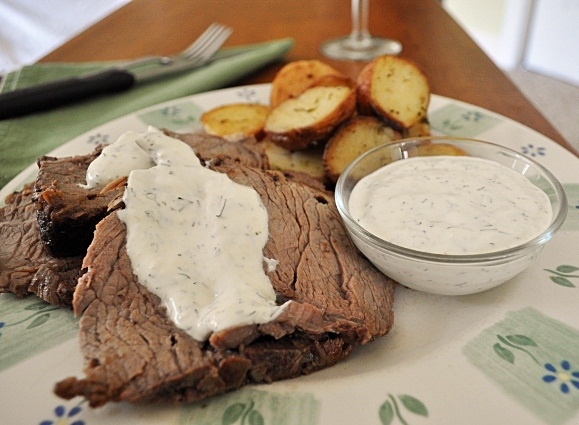
My oldest stepson, Chad, used to work at The Outback Steakhouse years ago.  One day we had Chad and his wife over for dinner, and my husband was cooking a beef roast on the rotisserie.  Chad asked if I had a dipping sauce for the beef, and of course I did not.  He suggested that we whip up a sauce like the one for the beef at The Outback, so he got on the internet and found a "copycat" recipe for it.  Since I like horseradish and dill, I figured I'd give it a try.

We put the sauce together, tasted it, then altered it to suit our preferences.  This sauce is down-right delicious, and perfect on beef!  Either as a dipping sauce for a roast, or on a roast beef sandwich, or (as I soon discovered) it is also fabulous on potatoes.  I bet you could find several uses for this sauce.....it's that good!  Thanks Chad, this one is a keeper.


Horseradish Dipping Sauce

2/3 cup sour cream
1/4 cup mayo
5-7 tsp horseradish
1/2 tsp sugar
1/2 tsp dried dill (or 1-2 tbsp fresh chopped)

Stir all ingredients together and let set a couple of hours before using.  Excellent on beef!

May 29, 2012

Banana Breakfast Squares


Even though I aspire to make everything from scratch, there are times when I either just don't have time OR (as in the case with this recipe) it's just so good the way it is, so why mess with it??

Back in 2009 I bought one of those magazines that was filled with Blue Ribbon recipe winners.  This recipe was in there, and I loved it from the moment I saw the picture!  Thankfully it is as good as it looks, and I have been making it ever since.  Banana pancakes are my favorite pancakes, so I just knew I would love this as well.  Both my husband and son (who are not fans of banana pancakes) both really enjoy this breakfast dish. 


This dish is perfect for when you have company.  It's quick and easy, so you can spend more time with your guests.  Really, it's perfect for anytime....

Banana Breakfast Squares adapted from Debbie Bracker's recipe


1, 17 oz can Pillsbury cinnamon rolls 
1 cup mashed bananas (2-3 medium)
3 eggs
3 tbsp granulated sugar
1/2 cup flour
1/3 cup packed brown sugar
1/4 butter, softened
1/2 cup walnuts
maple syrup

Preheat oven to 350, and spray a 8 x 8 baking dish with cooking spray.  In a large bowl combine eggs, banana and sugar until well blended.

Cut each cinnamon roll into 8 equal pie-shaped wedges.  Add the cinnamon rolls to the egg mixture and stir gently to combine.  Spoon mixture into the baking dish.  In a separate bowl, mix flour and brown sugar together.  With a fork cut in the butter until it looks like coarse crumbs.  Stir in walnuts, and sprinkle mixture over banana dough mixture.  


Bake 35-40 minutes or until center is puffed and set, and edges are golden brown.  To serve, cut into squares & drizzle with maple syrup.

May 27, 2012

Parmesan & Dill Encrusted Haddock


I have to admit that there are not many fish lovers in our house.  I seem to be the only one who loves fish, but they'll eat it if I make it for dinner.  Needless to say I do not make it very often.  However, when my husband is traveling I tend to take advantage of that time and I usually cook up some fish.  

This recipe can be used with any white fish, so whatever kind you prefer will go wonderfully with the Parmesan dill coating.

Parmesan & Dill Encrusted Haddock

4 Haddock fillets
1/3 cup milk
2/3 cup Parmesan cheese
4 tbsp seasoned bread crumbs
4 tbsp chopped fresh dill (more if you like)
2 tbsp melted butter
1 lemon, quartered

Preheat oven to 375, and spray a large baking dish with cooking spray (the size of your baking dish will depend on the size of your fish).  Pour milk into a large container, and place the haddock into the milk and turn to coat.  Add the Parmesan cheese, bread crumbs and dill to a large plate and mix it all together.  Take the each piece of haddock and dredge it in the Parmesan mixture and turn to evenly coat each side, pressing firmly.  

Place each haddock fillet in the baking dish.  Take a quarter of the lemon and squeeze the juice over the top of each fillet - a quarter of the lemon per each fillet.  Melt the butter in a small bowl in the microwave and sprinkle it evenly on top of each fillet.  Place baking dish in oven and bake for 20-25 minutes.  

May 25, 2012

Macaroni Salad


Ah, macaroni salad.  It's such a staple for cookouts, and in the summer everyone is making their own version of it.  Usually with waaaaay to much mayonnaise for my liking, but I won't get into how I don't like mayonnaise....again.  

I, of course, never ate macaroni salad when I was younger (yes, because of the mayo in it) but when I worked in the kitchen at my son's school there were several things I had to make that I didn't like.  Macaroni salad was one of them, so my co-worker Patty gave me a run down of how she made it at home for her family.  It sounded interesting, and more appealing to me than other versions I'd seen over the years.  Probably because she put tuna fish and peas in hers, and even though I don't like mayo, tuna is something I do like (even with mayonnaise in it).  I made it the way she instructed and I was shocked at how good it was.  I actually liked it!!!!


I brought a little of the left overs home for my husband to try, and he agreed it was delicious.  We were both excited - him because he knew it meant he would be eating it again in the future, and me because I discovered a macaroni salad that I enjoyed!  Since then, I have made this salad more times than I could ever count.  Even some picky eaters in our family like it!  Thank you Patty

Macaroni Salad

14.5 oz box elbow noodles (cooked, drained and cooled to room temp)
1 1/2 cups frozen peas, thawed (not cooked)
2 cans tuna (drained and crumbled up)
1 1/4-1/2 cup mayonnaise (start small and add more to suite your preference)
1 tsp salt
1/2 pepper
1/4 tsp garlic powder
1/2 tsp onion powder

Once the noodles are cooled to room temp, add them to a large bowl.  Add the remaining ingredients, and stir until completely combined.  Cover with plastic wrap and chill in refrigerator for at least 2 hours before serving.  When ready to serve, give it a stir.  If it seems a little dry add 1/4 cup more of mayonnaise, or as much as desire.  Taste and adjust seasoning if needed - it may need more salt and pepper, depending on your preferences.  Serves 10-12.

May 23, 2012

Sweet & Salty Cookies


As far back as I can remember I have always liked sweet and salty food combinations.  When I was very little I remember that my favorite thing to order at Wendy's was french fries and their chocolate frosty.  I always dipped my fries in the frosty because, even then, I loved the sweet and salty flavors.  I never would have eaten a frosty without the fries to dip in it (especially because I'm not much of a fan of chocolate), and I never would have ordered fries without the frosty!  Fast forward to now, and that is still my favorite thing to get at Wendy's!  Chocolate covered pretzels....um, let's just say that item would be on the top 10 list of my favorite things to eat.  

Recently we were going to have some family over for a cookout, and so early in the day I prepared a dessert.  It was something I had never made before, and without getting into details, it ended up being a kitchen disaster!  So, I had to come up with something else fast.  I had always wanted to try chocolate chip cookies with pretzels and potato chips in them, and I knew I had all the ingredients on hand so I quickly decided to go with that.   

Personally, I really like these cookies.  Now that I've created this recipe, I am already thinking of other ways to alter it...like maybe using mini Reese's peanut butter cups (those really tiny ones I've seen at the grocery store lately)I bet those would go well with the potato chips and pretzels.  Mmmm.....

Sweet & Salty Cookies


2 cups all-purpose flour
1 teaspoon baking soda
1 cup butter (2 sticks), softened
¾ cup packed brown sugar
¼ cup white sugar
1 (3.4 ounce) packages instant vanilla pudding mix
2 eggs
2 teaspoons vanilla extract
1 1/2 cups semisweet chocolate chips (I like to use Hershey chocolate chips)
1 cup crushed potato chips
1 cup pretzels, broken into little bits

Preheat oven to 350 degrees F (175 degrees C). In separate bowl combine the flour and baking soda and set aside.

In another large bowl, cream together the butter, brown sugar, and white sugar. Beat in the instant pudding mix until blended. Stir in the eggs and vanilla. Blend in the flour mixture until combined, then stir in the chocolate chips, potato chips and pretzels. I usually measure out about a ¼ cup of dough for each cookie and place on a cookie sheet sprayed with cooking spray. Bake for 12 to 15 minutes, or until the edges are golden brown.